

Escrow Settings #
The Escrow Settings page lets you configure Escrow.com payment integration in WordPress using the Domain For Sale plugin. This allows you to securely process domain transactions, send payment invitations, and track all activity directly from your admin dashboard.
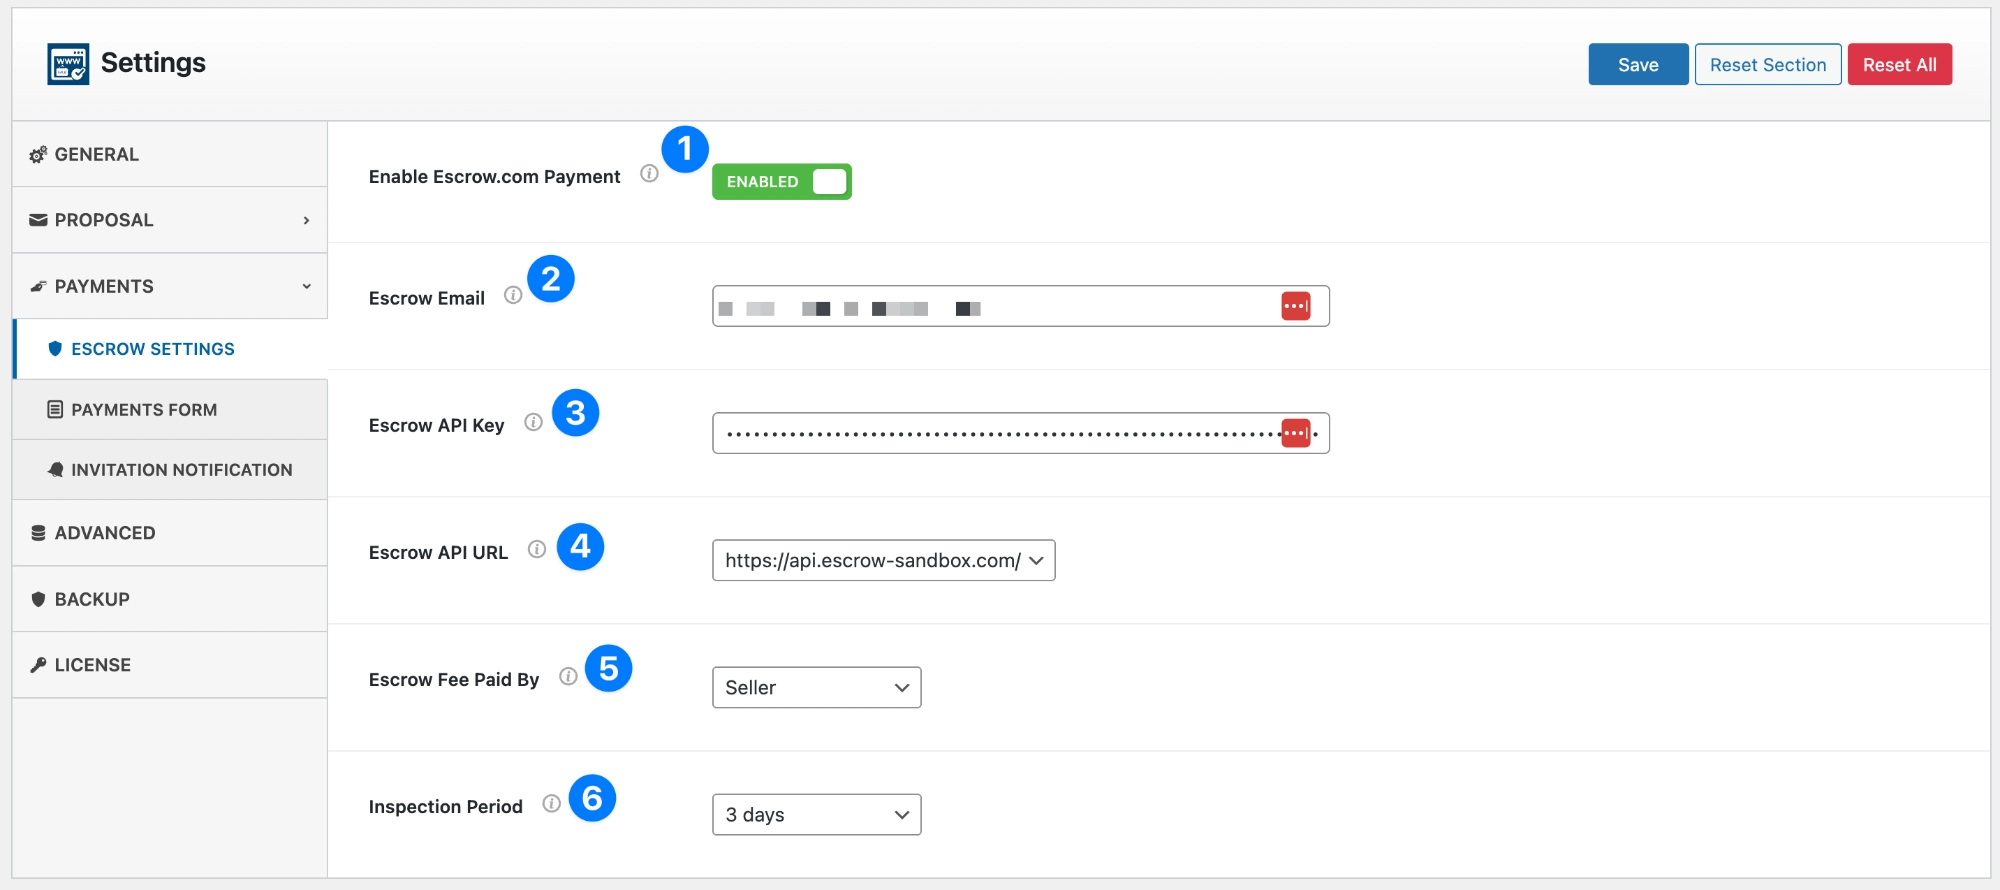
- Enable Escrow.com Payment: Toggle this switch to enable or disable Escrow.com payment integration.
- When enabled, the system will display an “Invite to Buy via Escrow” button inside the Offers section.
- Buyers who receive an invitation can securely complete their purchase via Escrow.com.
- When disabled, no Escrow payment links or invitations will be generated.
- Escrow Email: Enter the email address associated with your Escrow.com account.
- This email must match the one used to generate your API key.
- It identifies the account where funds will be received for all completed domain sales.
- Escrow API Key: Provide your Escrow.com API Key for authentication.
- The API key securely connects your WordPress site to your Escrow.com account.
- You can generate this key from your Escrow.com dashboard under Settings → API Keys.
- Keep this value private — do not share it publicly.
- Escrow API URL: Select which Escrow API endpoint you’d like to use:
- Sandbox (Testing):
https://api.escrow-sandbox.com/– Use this environment to test functionality before going live. - Live (Production):
https://api.escrow.com/-Switch to this URL once your setup has been verified and you’re ready for real transactions.
- Sandbox (Testing):
💡 Tip: Start in sandbox mode to ensure all invitation emails, transactions, and callbacks work correctly.
- Escrow Fee Paid By: Choose who will cover the Escrow.com service fee for each transaction.
- Seller: The domain owner (you) pay the Escrow fee.
- Buyer: The buyer pays the Escrow fee.
- Split: The fee is shared equally between both parties.
This option determines how the total transaction amount and payout are calculated.
- Inspection Period: Define the number of days the buyer has to review and approve the domain transfer before Escrow.com releases the funds. Common options:
- 5–7 Days: Allow more time for corporate or bulk transactions.
- 3 Days (default): Recommended for standard domain sales.
Here’s how the Escrow integration works in practice:
- Enable Escrow Payments under Settings → Payments → Escrow Settings.
- Add your Escrow Email and API Key, and choose the Sandbox API URL for testing.
- Once verified, switch to the Live API URL for real payments.
- Go to Offers → Invite to Buy via Escrow to send a payment link to a verified buyer.
- The buyer completes the payment via Escrow.com, and the transaction automatically appears in your Transactions tab.
Security Note: All Escrow.com connections use HTTPS and API authentication to ensure secure communication between your WordPress site and your Escrow account.
Your credentials are stored safely within WordPress using encrypted storage.
✅ Pro Tip: Use the Sandbox URL first to simulate a full test payment before going live — this ensures your email templates, transaction updates, and callbacks are working perfectly.
Payments Form #
The Payments Form tab allows you to configure the appearance and text of the purchase form displayed on your domain sales pages.
This section customizes how buyers interact when choosing to purchase a domain directly — especially when Escrow.com or both form types are enabled.
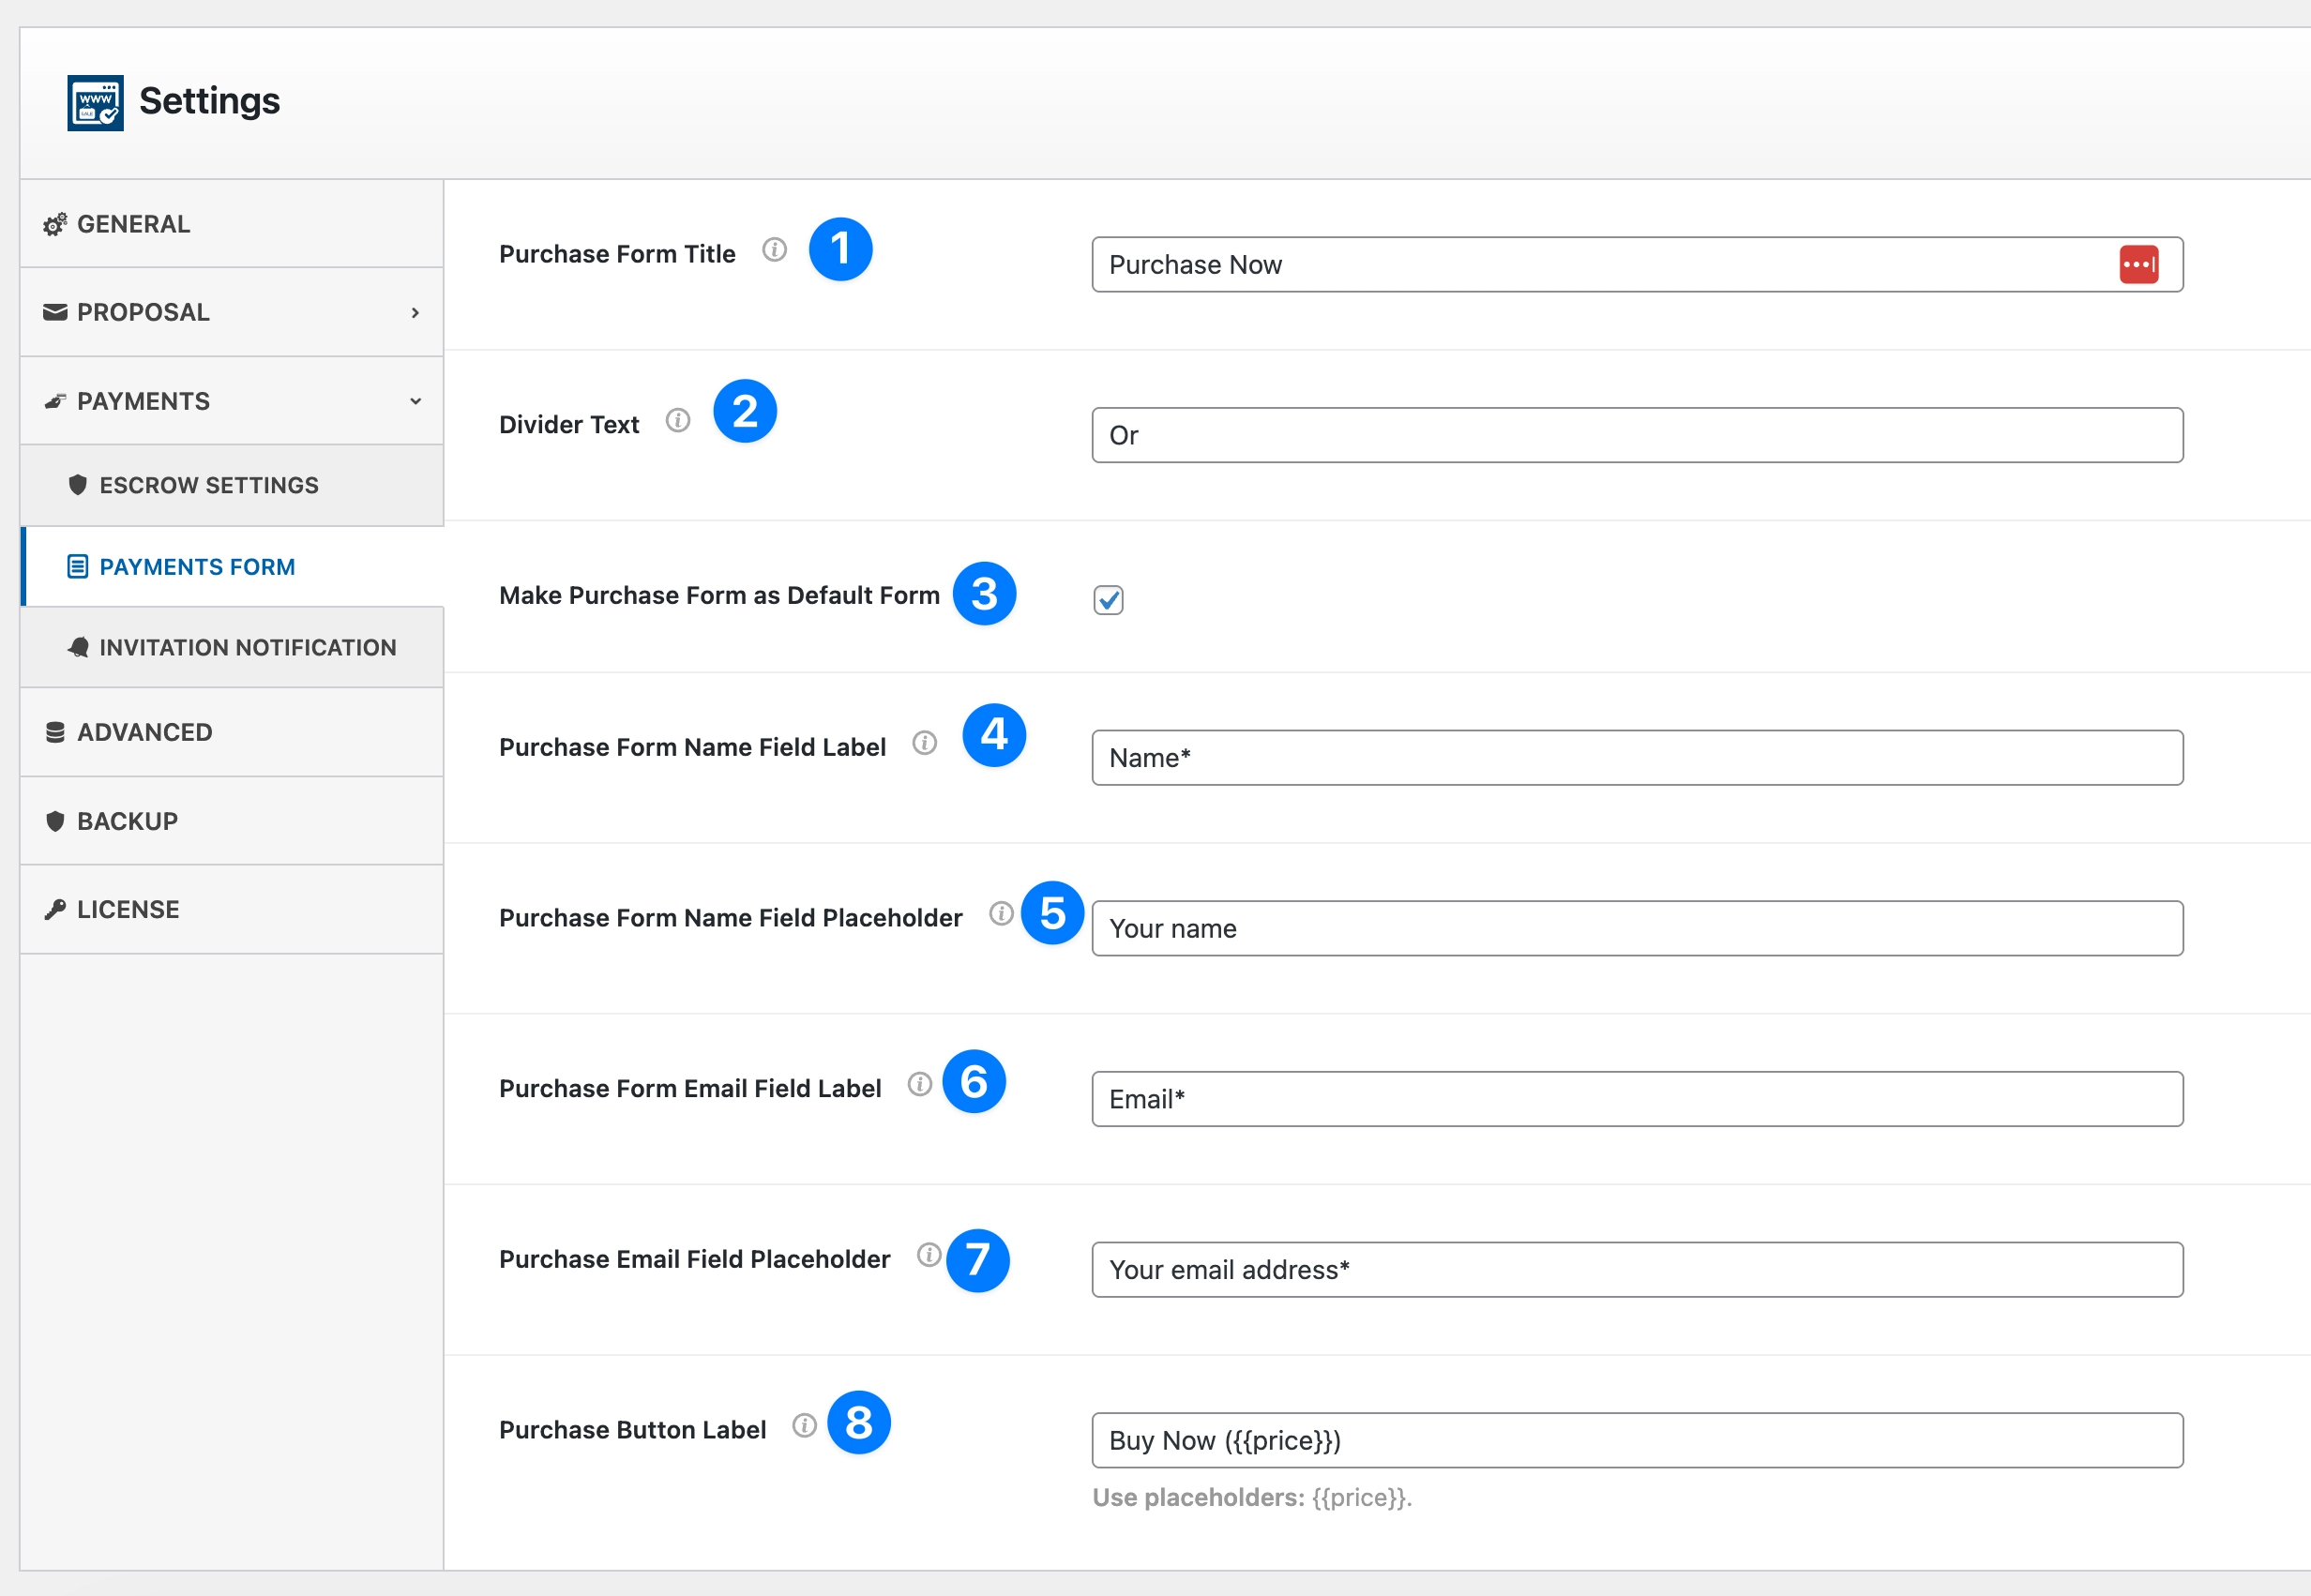
- Purchase Form Title: Set the title for your purchase form (e.g., Purchase Now, Buy This Domain).
- This title appears at the top of the form.
- If Form Type(s) is set to Both (Inside Tab), the title becomes the tab title for the purchase form.
- Example: “Purchase Now” will appear as the second tab next to “Make an Offer”.
- Divider Text: Add a short divider word between multiple form tabs.
- Common examples: Or, Alternatively, Choose an option.
- This divider appears only when both Offer and Purchase forms are used together.
- Example: Make an Offer or Purchase Now
- Make Purchase Form as Default Form: Enable this checkbox to make the Purchase Form appear first by default.
- When unchecked, the Offer Form will appear as the default tab.
- Useful if your sales strategy focuses on fixed-price or instant purchases.
- Purchase Form Name Field Label: Define the label that appears above the Name input field.
- Example: Name or Full Name.
- You can use symbols like
*to mark required fields.
- Purchase Form Name Field Placeholder: Enter the placeholder text that appears inside the Name input box.
- Example: Your name or Enter full name.
- Purchase Form Email Field Label: Set the label displayed above the Email input field.
- Example: Email or Your Email Address.
- You can include
*to indicate required fields.
- Purchase Email Field Placeholder: Define the placeholder text for the Email input field.
- Example: Your email address or Enter email to receive confirmation.
- Purchase Button Label: Customize the button text shown at the bottom of the purchase form.
- You can use the dynamic placeholder
{{price}}to display the domain’s price automatically. - Example: Buy Now (${{price}}) → Buy Now ($299)
- You can use the dynamic placeholder
💡 Note:
If Form Type(s) is set to Both (Inside Tab), then:
- The Purchase Form Title becomes the tab title.
- The Divider Text appears between the Offer and Purchase tabs.
- This provides a seamless two-tab experience allowing visitors to choose between Making an Offer or Buying Now.
Invitation Notification #
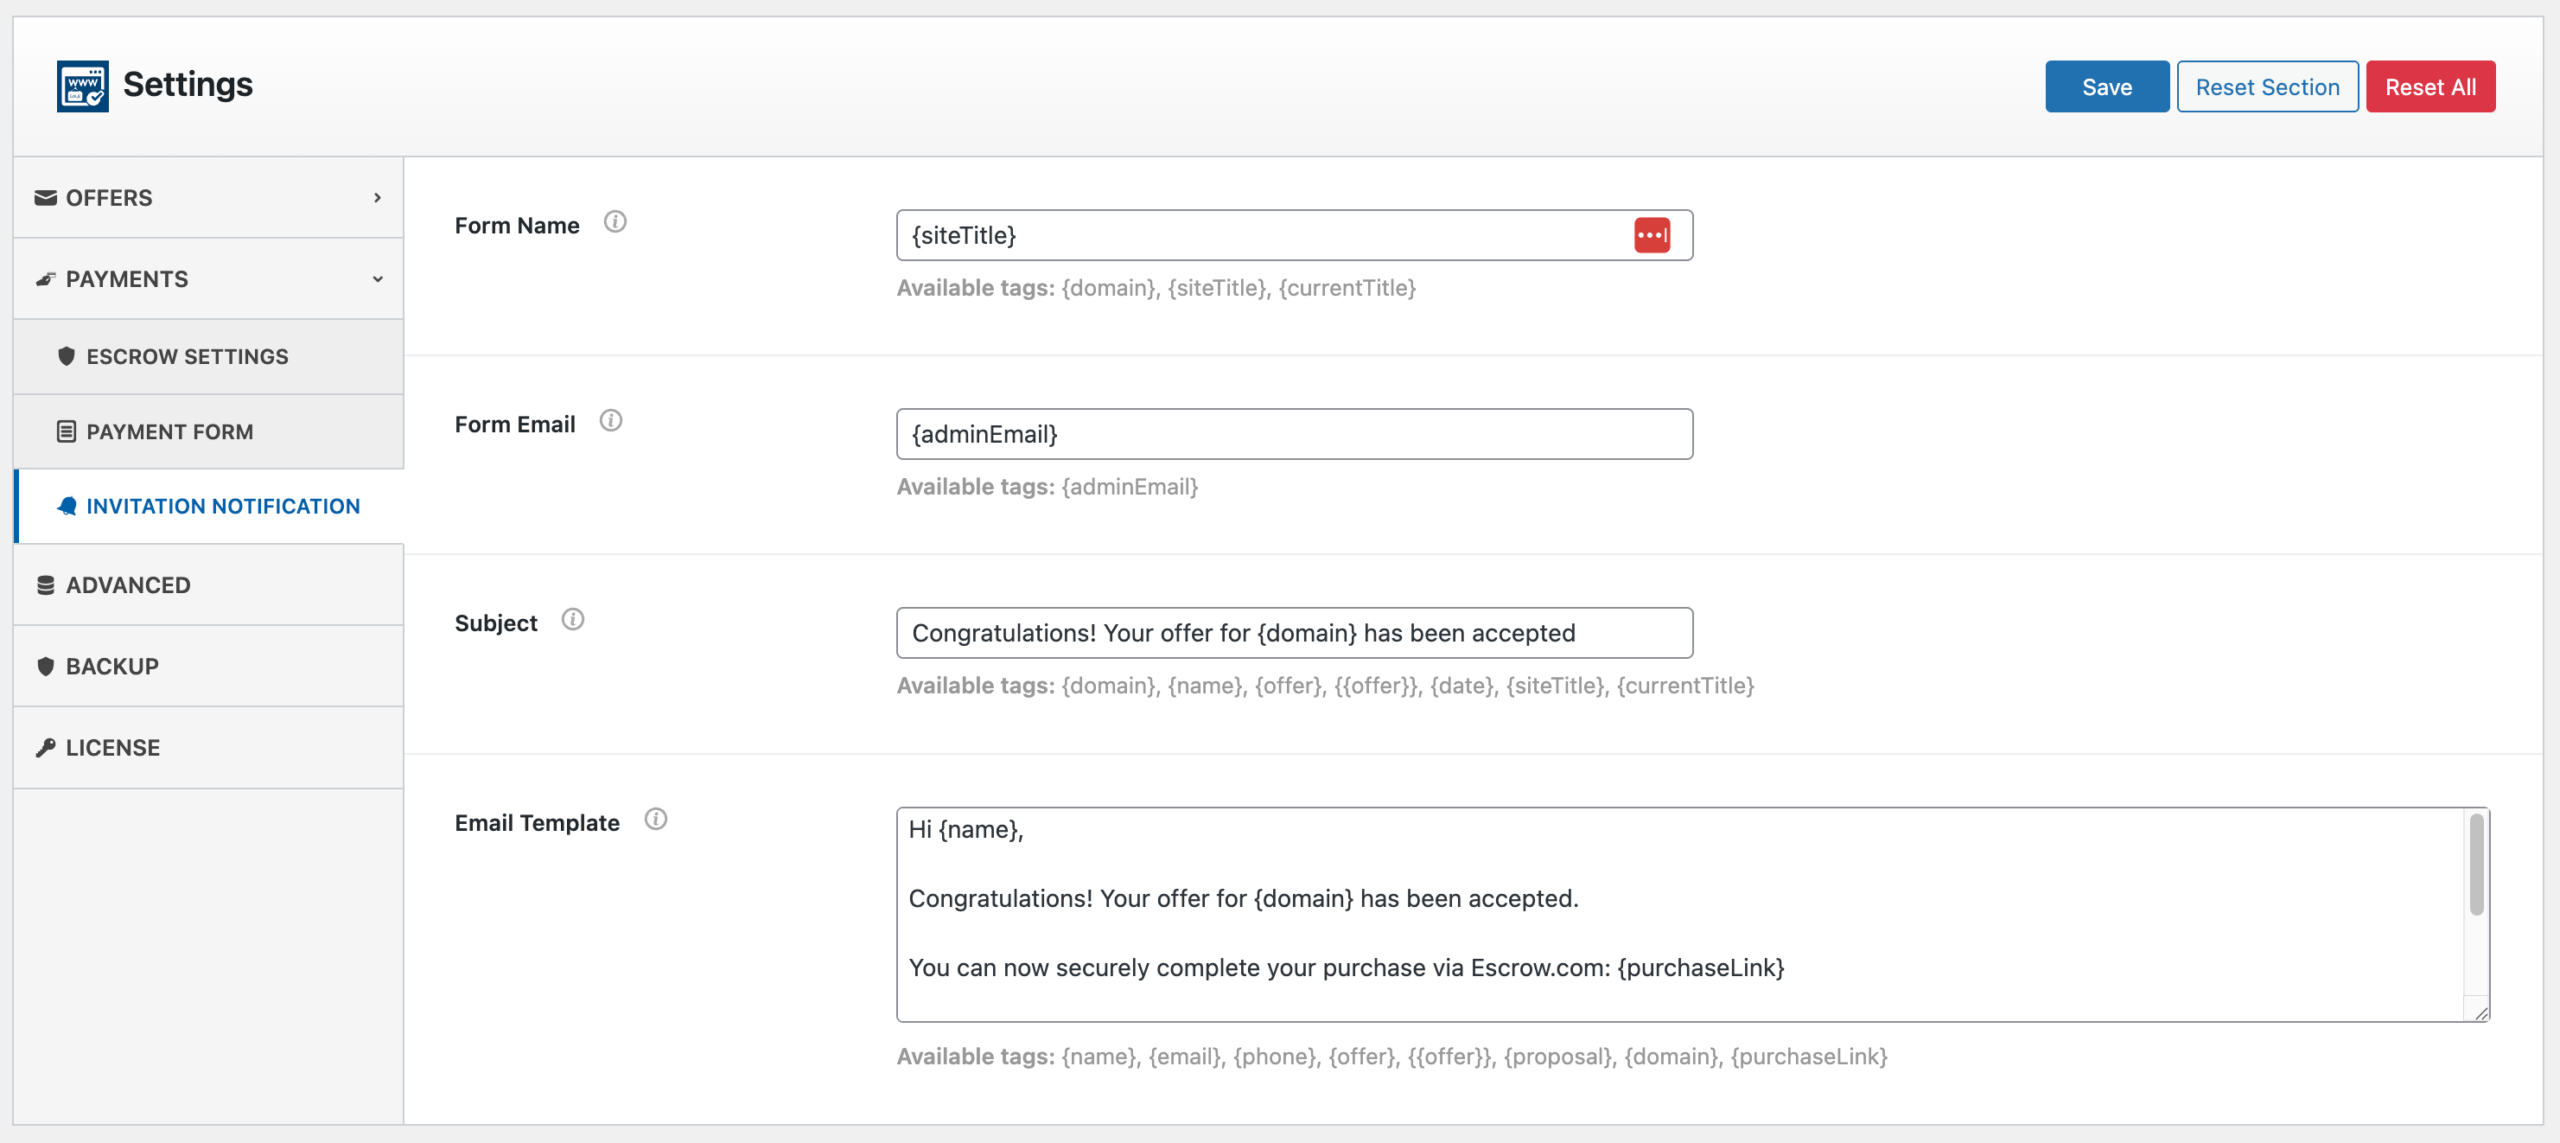
The Invitation Notification tab allows you to configure the confirmation email sent to buyers when they receive a purchase invitation via Escrow.com.
This feature ensures a professional and automated communication process once an admin accepts an offer and sends an Escrow payment link. In the Offer Management, it explained how you can send an invitation.
- Email Form Name: Set the name that will appear as the email sender in the buyer’s inbox.
- You can use dynamic tags like
{siteTitle}to automatically include your website name. - Example: YourDomainStore → emails will show as sent from YourDomainStore Team.
- Available tags:
{domain},{name},{offer},{date},{siteTitle},{currentTitle}
- You can use dynamic tags like
- Email Form Email: Define the sender’s email address that the confirmation message will come from.
- Use
{adminEmail}to automatically use the administrator email from your WordPress settings. - This helps ensure email deliverability and consistency with your site identity.
- Available tags:
{adminEmail}
- Use
- Purchase Confirmation Subject: Set the subject line of the confirmation email that buyers will receive once their offer is accepted.
- Example: “Congratulations! Your offer for {domain} has been accepted.”
- Use dynamic tags to personalize each message for the recipient.
- Available tags:
{domain},{name},{offer},{date},{siteTitle},{currentTitle}
- Purchase Confirmation Template: Write the email body content that buyers will receive.
- This message is automatically sent after an admin clicks “Send Invitation” in the Offers section.
- You can include placeholders for personalization and Escrow payment links.
- Example default message: Hi {name}, Congratulations! Your offer for {domain} has been accepted. You can now securely complete your purchase via Escrow.com: {purchaseLink} Once your payment is confirmed, the domain transfer will begin. Best regards, The {siteTitle} Team
- Available tags:
{name},{email},{phone},{offer},{proposal},{domain},{purchaseLink}
💡 Tip: Use {purchaseLink} to include the buyer’s direct Escrow.com payment link. This ensures a seamless checkout experience and helps automate the sale process after admin approval.


