



A parked domain earns you nothing. Every visitor who types it in and hits a registrar parking page — or worse, an error — is a potential buyer walking away. The fix is a proper domain for sale landing page in WordPress: a clean, professional page that shows the domain name, the price, and a form where serious buyers can make an offer.
In this tutorial, you’ll build exactly that using the free Domain For Sale plugin by ThemeAtelier. No coding, no page builder gymnastics. By the end, you’ll have a live landing page, a way to list multiple domains, and offers arriving straight in your WordPress dashboard.
Key Takeways
- The free Domain For Sale plugin lets you create a professional domain sales landing page in WordPress in under 15 minutes, with no coding required.
- Install it from Plugins → Add New, then add your domain under Domain For Sale → Add New with a name, price, description, and contact details.
- You can price a domain two ways: a fixed price or a “receive offers” form where buyers name their own figure.
- Four display options are available: replace your active theme entirely, embed via shortcode, use the Gutenberg block, or drop in the Elementor widget.
- The Domain Listing feature displays your whole portfolio on one page in a grid or list layout — useful if you’re selling more than one domain.
- All buyer offers land in a central Offers dashboard where you can review, filter, and update their status.
- If notification emails don’t arrive, an SMTP plugin (like WP Mail SMTP or FluentSMTP) almost always solves it.
Table of Contents
Step 1: Install the Domain For Sale Plugin
Start from your WordPress dashboard. Go to Plugins → Add New and search for “Domain For Sale”. Look for the plugin by ThemeAtelier — it’s free, and it runs on any reasonably current setup (WordPress 5.9 or later, PHP 7.4 or later).
Click Install Now, wait a few seconds, then click Activate.
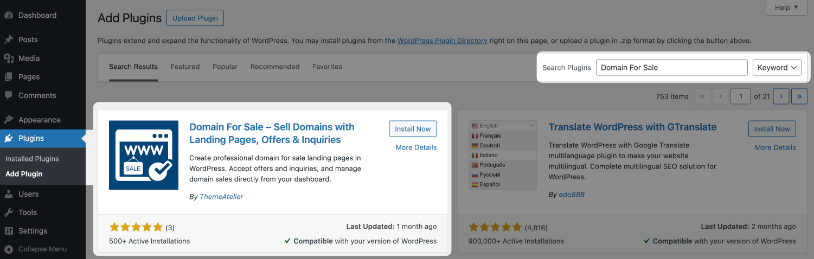
Once activated, you’ll see a new Domain For Sale menu in your admin sidebar. This is home base for everything that follows: your domains, your listing page, incoming offers, and settings. Take a quick look around before moving on — the dashboard even shows live stats like impressions and offers once your page is up.
That’s the whole installation. If you ever get stuck later, the official Quick Start Guide walks through the same flow with annotated screens.
Step 2: Add Your Domain
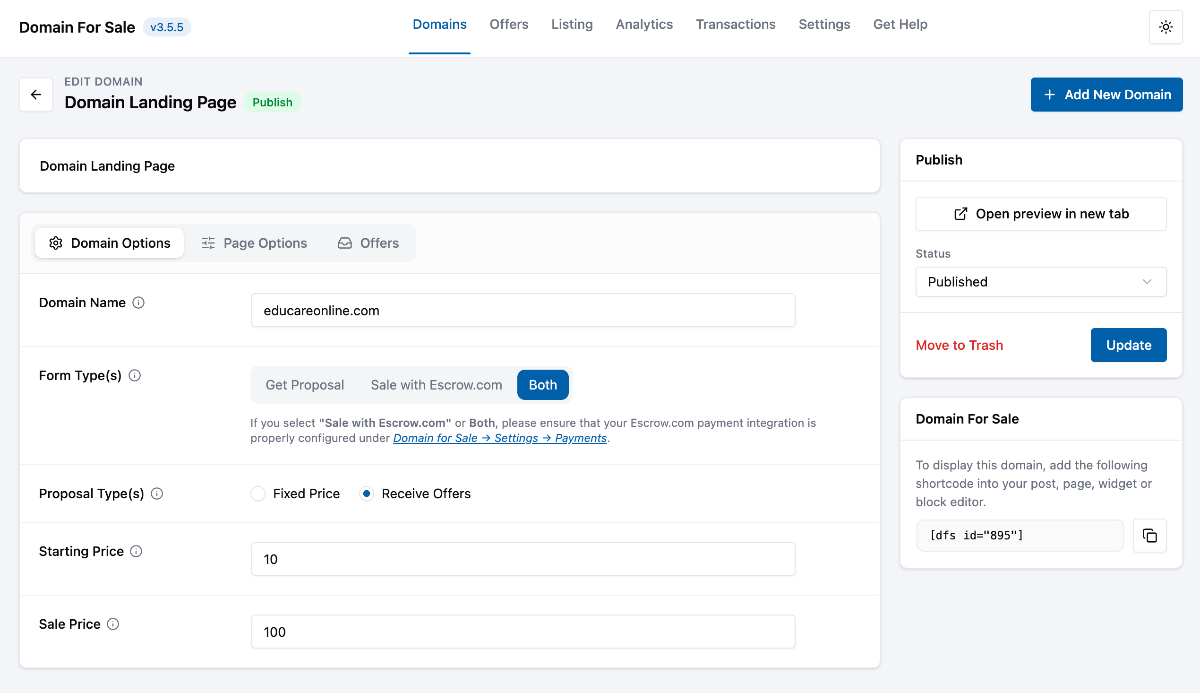
Head to Domain For Sale → Add New. This is where you create the actual sale page content. The plugin gives you a ready-made layout, so your job is mostly filling in the details that matter to a buyer.
Domain name
Enter the exact domain you’re selling. This becomes the headline of the landing page, so double-check the spelling — I’ve seen more than one sale page live for weeks with a typo in the domain itself.
Asking price
You have two pricing options, and the choice shapes how buyers behave:
- Fixed Price — you state a number, and the buyer either pays it or negotiates down from it. Best when you know the domain’s market value.
- Receive Offers — buyers submit their own figure through the offer form. Best when you’re testing demand or the domain is hard to price.
Pro Tip: If you use “Receive Offers,” set a minimum you’d actually accept and mention it in the description. It filters out the $50 lowballs without scaring off real buyers.
Description and content
Use the content fields to customize the sale title, offer tag, and description. Don’t just write “premium domain for sale” — say why it’s worth buying. Is it short? Brandable? An exact-match keyword? Does it have age or existing traffic? Two or three specific sentences beat a paragraph of hype every time.
Contact information
Add the email address where you want inquiries to go, plus any other contact details you’re comfortable publishing. Buyers spend real money on domains, and a visible way to reach a human makes your page look legitimate rather than parked-and-forgotten.
When everything looks right, publish the domain. You can come back and edit any of this later — nothing is locked in.
Step 3: Choose How to Display Your Domain For Sale Landing Page
Here’s where the plugin is genuinely flexible. There are four ways to put your landing page in front of visitors, and the right one depends on how you’re using the domain’s WordPress install.
Option 1: Replace the active theme
This mode takes over the entire site. Anyone visiting any URL on the domain sees your sale page — no header, no blog, nothing else. It’s the right choice when the WordPress install exists only to sell the domain, which is the most common scenario for domainers.
Option 2: Shortcode
The plugin generates a shortcode for each domain you create. Paste it into any post or page and the sale template renders right there. Use this when the site has other content you want to keep — say, a blog that’s staying live while you quietly shop the domain around.
Option 3: Gutenberg block
If you prefer the block editor, add the plugin’s Domain For Sale block to any page and pick the domain template you want to show. Same result as the shortcode, but visual — you see the landing page inside the editor as you build.
Option 4: Elementor widget
Elementor users get a dedicated widget. Drag it into any Elementor layout and select your domain. This is handy for agencies that already build client sites in Elementor and want the sale page to match an existing design system.
| Display option | Best for |
|---|---|
| Replace active theme | Dedicated sale sites — the domain exists only to be sold |
| Shortcode | Sites with existing content you want to keep live |
| Gutenberg block | Block editor users who want visual placement |
| Elementor widget | Elementor-built sites and agency workflows |
Pro Tip: For a domain that’s purely for sale, use “replace theme” mode and skip building pages entirely. Fewer moving parts, faster load, and the buyer sees exactly one thing: your offer form.
Step 4: Create a Domain Listing (Selling More Than One Domain)
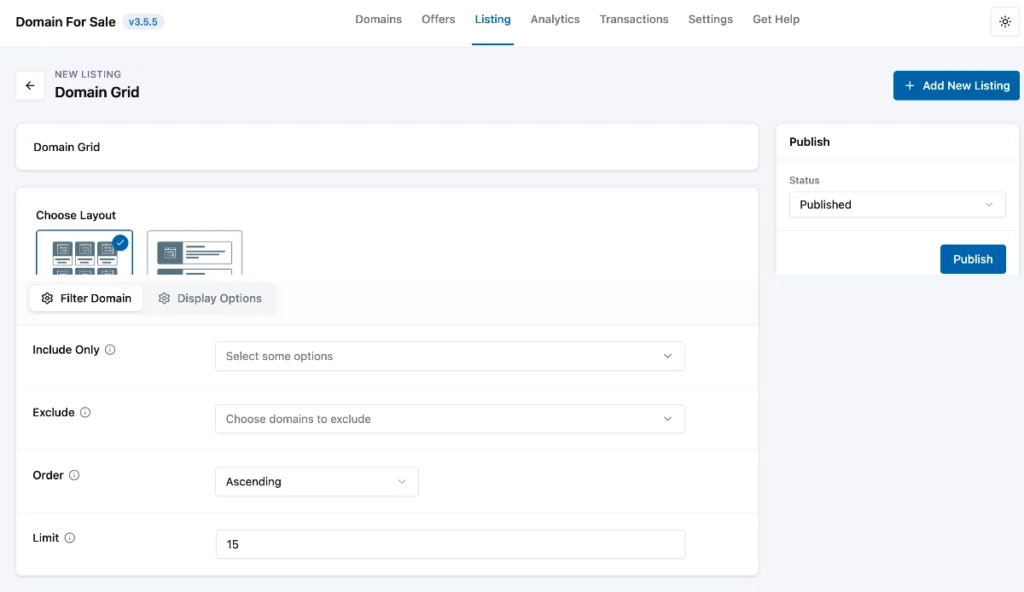
Selling a portfolio rather than a single name? The Domain Listing feature displays multiple domains on one page, so buyers can browse everything you have available.
Go to Domain For Sale → Domain Listing in your admin menu. From there you can build a listing that pulls in the domains you’ve added, then choose between a grid layout (visual, card-style) or a list layout (compact, easier to scan when you have many names). Embed the listing on any page, and each domain links through to its own landing page and offer form.
This setup works nicely as a hub-and-spoke: one “domains for sale” page listing the whole portfolio, with individual landing pages doing the actual selling. And if you manage a large portfolio, the plugin supports bulk-importing domains from CSV, XML, or JSON files instead of adding them one at a time — check the Tools section.
Pro Tip: Put your strongest three to five domains at the top of the listing. Buyers rarely scroll through 80 names — lead with the ones most likely to start a conversation.
Step 5: Manage Offers From Your Dashboard
Once your page is live, offers arrive through the built-in form — and every submission is stored in WordPress, not just fired off as an email you might lose. Go to Domain For Sale → Offers to see them all in one place.
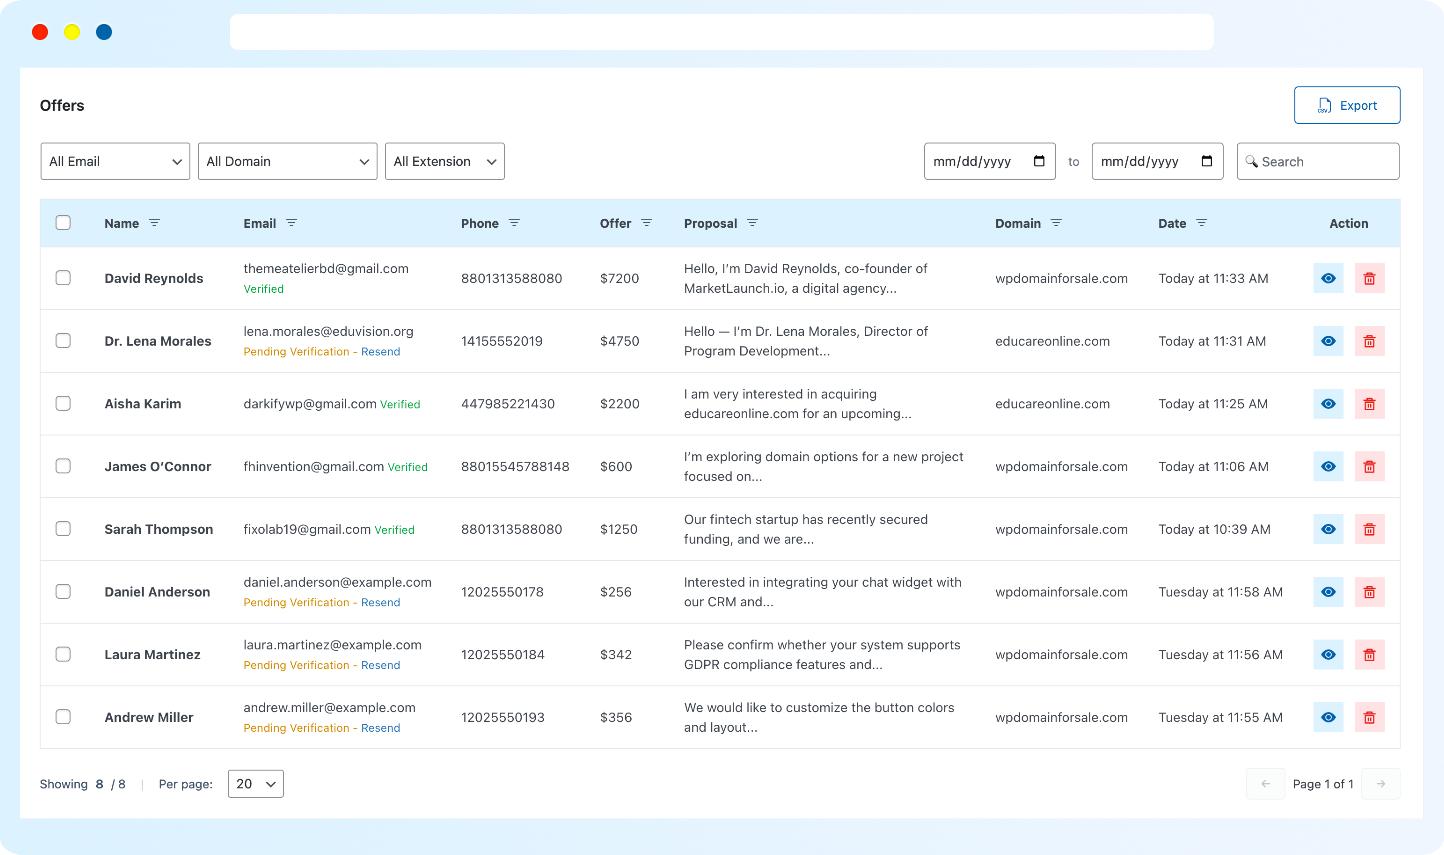
For each submission you’ll see the buyer’s name, email, phone number, their offer amount, and any message they included. You can search and filter the list, which matters more than you’d think once a decent domain starts pulling ten inquiries a week.
As negotiations progress, update each offer’s status so you can tell at a glance which conversations are active, which are dead, and which are close to a deal. Treat it like a lightweight CRM: respond to serious offers within a day, mark the spam, and keep notes moving. Slow replies kill domain deals — buyers shopping for names are usually shopping several at once.
Pro Tip: Reply to every real offer, even the low ones. A polite “thanks, but I’m looking for something closer to $X” converts surprisingly often — the first offer is almost never the buyer’s ceiling.
Step 6: Set Up Email Notifications
The plugin sends two kinds of email automatically: a notification to you when someone submits an offer, and a confirmation to the buyer so they know their offer went through. You can customize the templates in the plugin’s settings using dynamic tags like {domain}, {name}, and {offer}, which fill in the real values for each submission.
One honest warning: if notifications aren’t arriving, the problem is almost never this plugin. WordPress sends mail through PHP’s default mail function, and many hosts either block it or deliver it straight to spam. It’s the single most common “bug” report for any WordPress plugin that sends email.
The fix is an SMTP plugin. Install WP Mail SMTP or FluentSMTP (both free), connect it to a real mail service — your host’s SMTP, Gmail, Brevo, whatever you use — and send the test email the plugin offers. Once that test lands in your inbox, offer notifications will too.
Quick troubleshooting checklist if emails still go missing:
- Check your spam folder first — it’s the culprit half the time.
- Confirm the notification email address in the plugin settings is correct.
- Send a test email from your SMTP plugin to verify WordPress can send mail at all.
- Submit a test offer yourself from an incognito window and watch what happens.
Frequently Asked Questions
Can I sell a domain directly from WordPress?
Yes. With the free Domain For Sale plugin, WordPress handles the storefront side of the sale: a landing page showing the domain and price, plus an offer form that collects buyer details straight into your dashboard.
The actual transfer of the domain and money still happens outside WordPress — typically through an escrow service for anything beyond pocket change. The Pro version adds Escrow.com integration to connect those two halves, but the free version covers everything up to the handshake: attracting the buyer, presenting the domain, and capturing the offer.
Does the plugin work with Elementor?
Yes. The plugin ships with a dedicated Elementor widget. Drag it into any Elementor layout, choose the domain template you created, and the full landing page — price, description, and offer form — renders inside your design.
If you don’t use Elementor, you’re not missing functionality. The shortcode and Gutenberg block produce the same landing page; the widget is simply the most convenient route for Elementor-built sites.
Can I create landing pages for multiple domains?
Yes — the free version supports unlimited domains. Each one you add under Domain For Sale → Add New gets its own landing page with its own price, description, and offer form.
To show them all together, use the Domain Listing feature (Step 4 above), which displays your portfolio in a grid or list on a single page. Portfolio owners can also bulk-import domains via CSV, XML, or JSON rather than entering them individually.
How do visitors submit offers?
Every landing page includes a built-in offer form. The buyer enters their name, email, phone number, offer amount, and an optional message, then submits — no account or login required on their end.
The submission is saved to your Offers dashboard in WordPress, you get an email notification, and the buyer receives an automatic confirmation. From there, negotiation happens by email or whatever contact method you’ve published.
Why am I not receiving email notifications?
Almost always because your host isn’t delivering WordPress email reliably — not because of the plugin. Default PHP mail is blocked or spam-filtered on many hosts.
Install a free SMTP plugin such as WP Mail SMTP or FluentSMTP, connect it to a real email service, and send its test email. Once the test arrives, offer notifications will follow. In the meantime, no offers are lost — everything is stored in the Offers dashboard regardless of email delivery.
Do I need the Pro version?
Not to follow this tutorial. Everything covered here — unlimited domains, all four display modes, the listing page, offer management, and email notifications — is in the free version.
Pro adds features aimed at active domainers: Escrow.com integration for secure payments, additional layouts and customization, and priority support. If you’re selling one domain casually, free is plenty. If domains are a business for you, compare plans on the pricing page and decide whether the escrow workflow alone pays for itself.
You’re Live — Now Let the Page Do the Work
That’s the full setup: plugin installed, domain added with a price and description, a display mode chosen, and offers flowing into a dashboard you’ll actually check. The whole thing takes about fifteen minutes, and it turns a dead parked domain into a page that can negotiate on your behalf around the clock.
If you later want escrow-backed payments and more layout control, the Pro version is worth a look — but start free, get the page live, and let real buyer interest tell you what you need next.