


The riskiest moment in a domain sale is the handover — when money and domain ownership must change hands between two people who usually don’t know each other. Learning to accept domain payments securely means taking that handover out of email and into a protected transaction before anything changes hands. An escrow service does this by holding the buyer’s payment while the agreed transfer process is completed. With the Escrow.com integration for WordPress in Domain For Sale Pro, you can offer that protected purchase flow directly on your domain sale page instead of coordinating every step over email.
To be clear up front: Escrow.com handles the transaction and the funds — not your WordPress site. This guide covers how escrow protects both sides, how to connect Escrow.com to WordPress, how to test the setup safely, and when it’s actually safe to transfer the domain. No method removes every risk, but this one removes the avoidable ones.
Table of Contents
Key Takeaways
- Escrow keeps the buyer’s payment separate from the seller until the agreed transaction requirements are completed.
- A seller should never begin transferring a domain based only on an emailed payment claim, screenshot, or forwarded confirmation.
- Before transferring, the seller should log in to Escrow.com directly and confirm the transaction shows the buyer’s funds are secured.
- Domain For Sale Pro can display an Escrow.com purchase option on a WordPress domain sale page and send Escrow invitations to buyers who made an offer.
- The integration reduces manual transaction setup, but it does not transfer the domain — the seller still completes the registrar transfer.
- Escrow fees apply, and the buyer and seller can agree on who pays them — the plugin supports Seller, Buyer, or Split arrangements.
Why Escrow Is Safer Than Accepting Payment Directly
Direct payment can work between parties who trust each other. The problems appear when strangers transact: the buyer pressures you to move quickly, the payment method turns out to be reversible, or the two sides disagree afterward about what was included. Escrow puts a neutral, licensed third party between the money and the domain. These are the patterns worth understanding first.
Reversible or Disputed Payments
Some payment methods let the sender dispute or reverse a transaction after the fact, depending on the method, provider, and circumstances. Not every card or PayPal payment gets reversed — but a domain, once transferred, is hard to get back if the payment later disappears. Escrow removes that timing problem: funds are secured before you transfer anything.
Fake Payment Confirmations
Fraudulent buyers sometimes send edited screenshots, fake bank emails, lookalike Escrow.com messages, invented transaction IDs, or claims that a payment is “pending” and will clear once the domain is transferred. None of these prove anything. The defense is simple: never act on a message someone sends you. Type escrow.com into your browser yourself, log in, and check the transaction status there.
Pressure to Transfer Early
Treat phrases like “the payment will clear after you send the authorization code” as a warning sign. Legitimate escrow works in the opposite order: the funds are secured first, and then the transaction status tells you the transfer can begin. Urgency is a negotiating tactic at best and a fraud signal at worst — a real buyer can wait for the process.
Disagreement After Transfer
Even honest deals go wrong when the terms were vague. Written transaction terms define the exact domain, the price, who pays the fees, the inspection period, the transfer method, and whether any website files or other assets are included. Escrow.com records these terms as part of the transaction, which prevents most “that’s not what we agreed” arguments. It isn’t a substitute for legal advice — but it’s a record both sides accepted.
How Escrow.com Works for Domain Sales
Escrow.com is operated by Internet Escrow Services, Inc., a licensed escrow and money-services business in the jurisdictions where it operates. The standard domain transaction follows this sequence:
- The buyer and seller agree on the domain, price, fees, and transaction terms.
- The transaction is created through Escrow.com.
- The buyer sends payment to Escrow.com — not to the seller.
- Escrow.com confirms the payment has been secured.
- Escrow.com instructs the seller to begin the domain transfer.
- The seller transfers the domain following the registrar and transaction instructions.
- The buyer confirms receipt, or the inspection and verification process completes.
- Escrow.com releases the funds to the seller according to the transaction terms.
The exact flow varies with the transaction configuration, the registrar, whether the domain is pushed internally or transferred between registrars, the inspection period, and payment verification. Escrow.com also offers a domain concierge service that can manage the transfer step. The details differ; the principle doesn’t — money and domain never depend on trusting the other party’s word. Full details are on the official Escrow.com domains page.
Who Should Consider Using Escrow?
Escrow makes the most sense when the buyer and seller don’t know each other, the domain has meaningful value, the transaction crosses borders, or either side wants written terms and a neutral process. Sellers worried about payment reversals and buyers worried about actually receiving the domain are both protected by the same mechanism. There’s no magic minimum price — weigh the escrow fee against what a failed handover would cost you. Whether it’s your first sale or your fiftieth, the goal is the same: accept domain payments securely instead of hoping the other side follows through.
What You Need to Accept Domain Payments Securely With Escrow.com
- A working WordPress site with HTTPS enabled
- The Domain For Sale plugin set up with your domain listing and correct sale price
- An active Domain For Sale Pro license (the Escrow integration is a Pro feature)
- An Escrow.com account, with any identity or account verification Escrow.com requires already completed
- The email address associated with that Escrow.com account
- An Escrow.com API key (covered in Step 4)
- A recent backup of your WordPress site
[VERIFY: Confirm whether Domain For Sale Pro requires the free plugin to remain installed and active.]
If you haven’t built the sale page itself yet, do that first. [INTERNAL LINK: How to Set Up a Domain For Sale Landing Page in WordPress]
Connecting Escrow.com to Your WordPress Domain Sale Page
The steps below connect Domain For Sale Pro to Escrow.com, test the setup in sandbox mode, and take it live. Follow them in order — the testing steps exist because payment settings are the one place where a small mistake is expensive.
Step 1: Install or Confirm the Domain For Sale Plugin
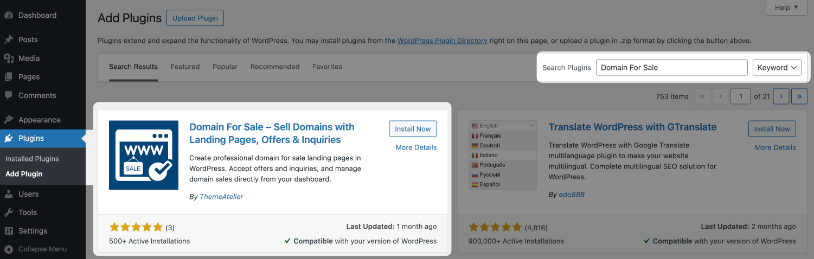
If it isn’t installed already, get the free Domain For Sale plugin from WordPress.org via Plugins → Add New and set up your domain listing with its name and sale price. This guide won’t repeat the landing page setup — the full walkthrough is here: How to Set Up a Domain For Sale Landing Page in WordPress
Step 2: Install and Activate Domain For Sale Pro
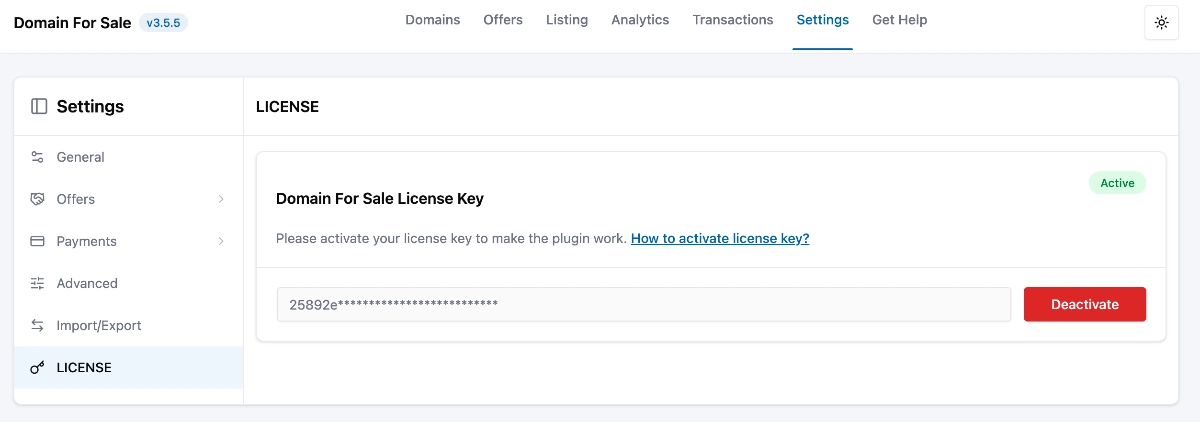
Download the Pro ZIP file (domain-for-sale-pro.zip) from your account on wpdomainforsale.com. In WordPress, go to Plugins → Add New → Upload Plugin, select the ZIP, click Install Now, then Activate Plugin. On the license screen that follows, paste the license key from your purchase email into the License Key field and click Activate to enable the Escrow integration, updates, and support.
Step 3: Create or Prepare the Escrow.com Account
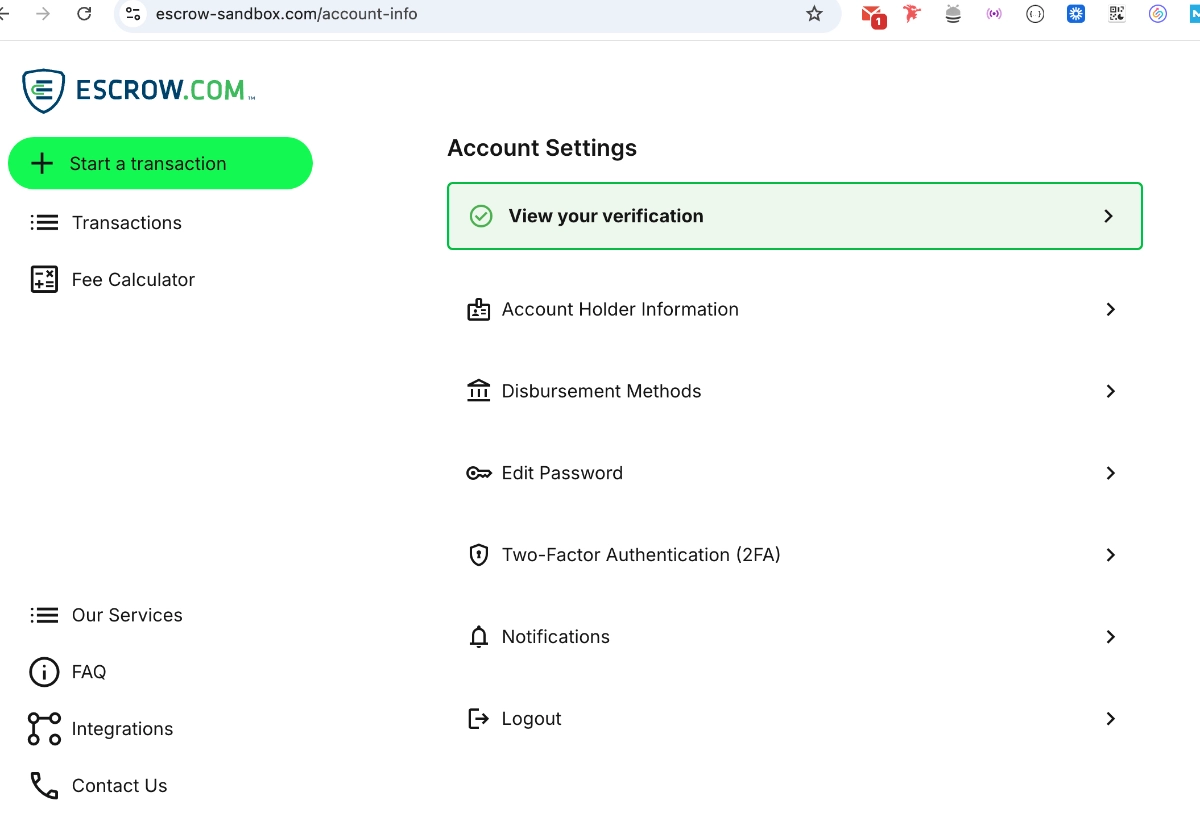
You need an Escrow.com account before anything can connect. Depending on the transaction and your jurisdiction, Escrow.com may require identity, business, or banking verification — and approval isn’t instant. Complete these account steps now, before a buyer is ready to pay, so verification doesn’t stall a live sale at the worst possible moment.
Step 4: Generate an Escrow.com API Key
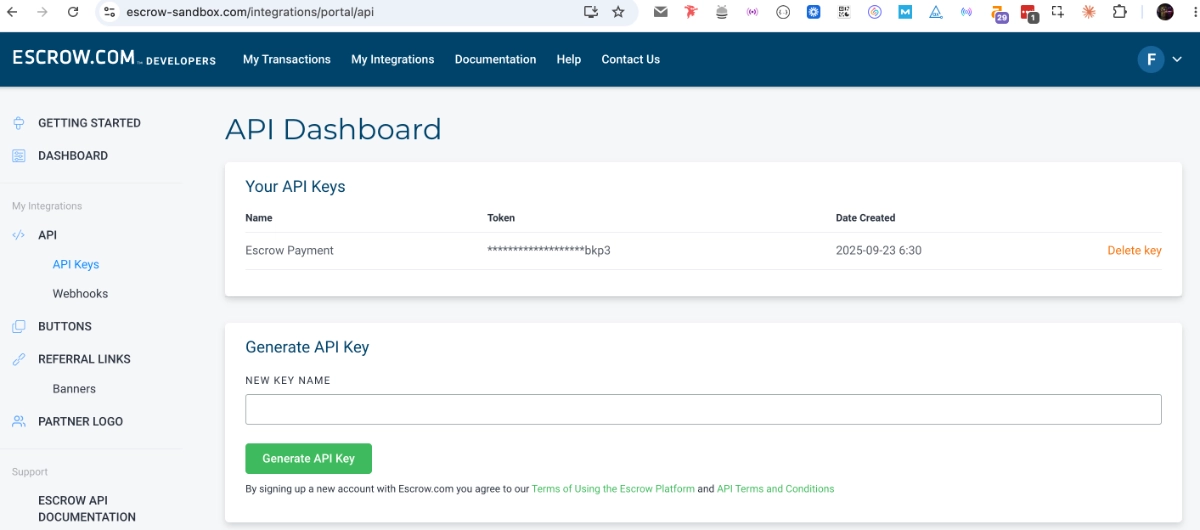
An API key is a private credential that lets your WordPress site talk to your Escrow.com account — think of it as a password issued for software. Generate one from your Escrow.com account. [VERIFY: Confirm the current Escrow.com menu path for generating an API key.]
Treat the key like a password: never publish it, never include it in a screenshot, don’t send it through email or chat, and store it only in the plugin’s API key field. If it’s ever exposed, revoke it in Escrow.com and generate a new one.
Step 5: Open the Domain For Sale Payment Settings
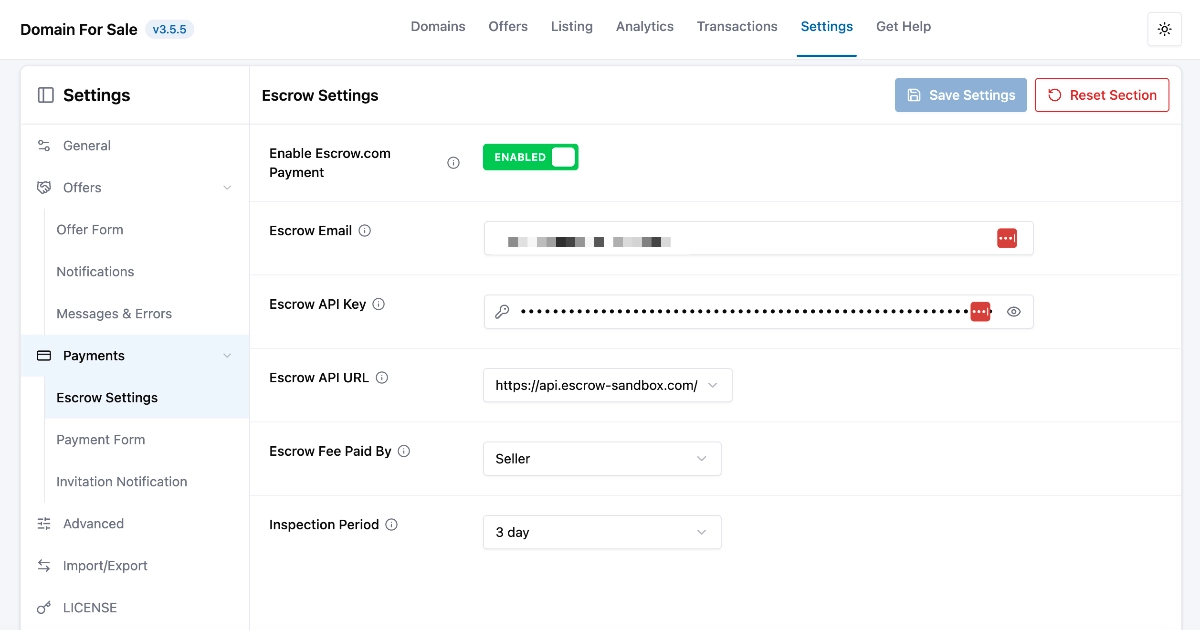
In WordPress, go to Domain For Sale → Settings → Payments. You’ll find three tabs: Escrow Settings (the connection itself), Payments Form (what buyers see on the purchase form), and Invitation Notification (the emails buyers receive). Start with Escrow Settings.
Step 6: Enable the Escrow.com Integration
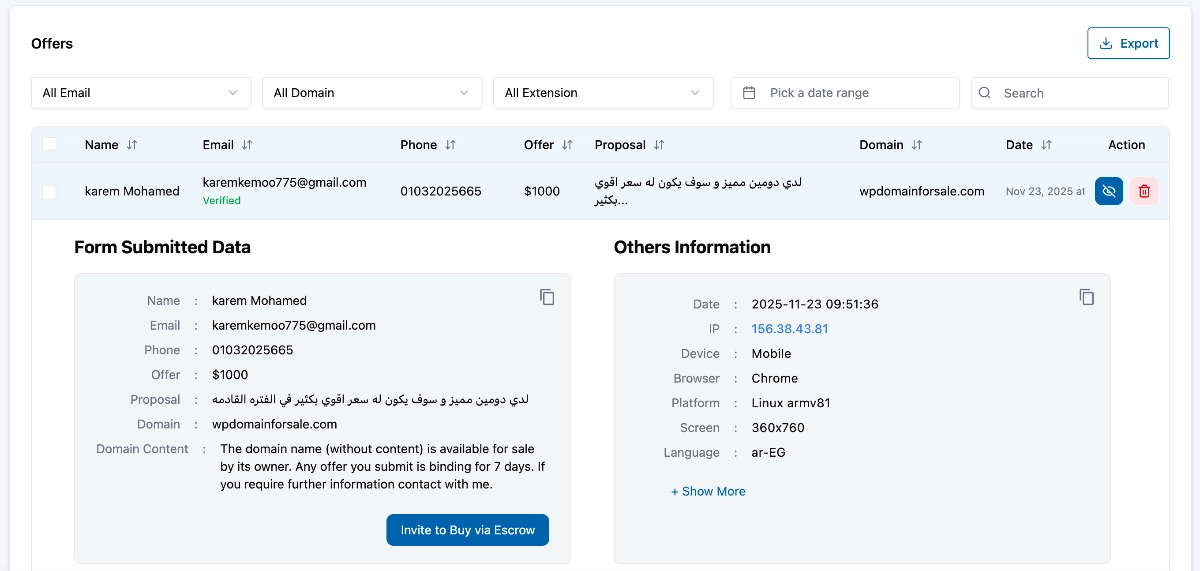
Turn on the Enable Escrow.com Payment toggle. This activates the integration and adds an Invite to Buy via Escrow option to your Offers screen. When the toggle is off, Escrow purchase forms and invitations aren’t generated — useful if you ever need to pause payments while adjusting settings.
Step 7: Enter the Escrow Email and API Key
Fill in the Escrow Email field with the email address on your Escrow.com account, and paste your key into the Escrow API Key field. The email must match the account that generated the API key — a mismatch here is one of the most common causes of a failed connection. While you’re in this tab, note the Escrow Fee Paid By option (Seller, Buyer, or Split) and the inspection period setting, which defaults to 3 days.
Step 8: Select Sandbox Mode for Testing
The Escrow API URL dropdown offers two environments: Sandbox, for testing without real transaction activity, and Live, for production. Select Sandbox first. Sandbox accounts and credentials can differ from live ones, so if the sandbox asks for separate test credentials, that’s expected. Don’t skip this — testing in sandbox is how you find configuration mistakes before a real buyer does.
Step 9: Enable the Escrow Purchase Form for a Domain
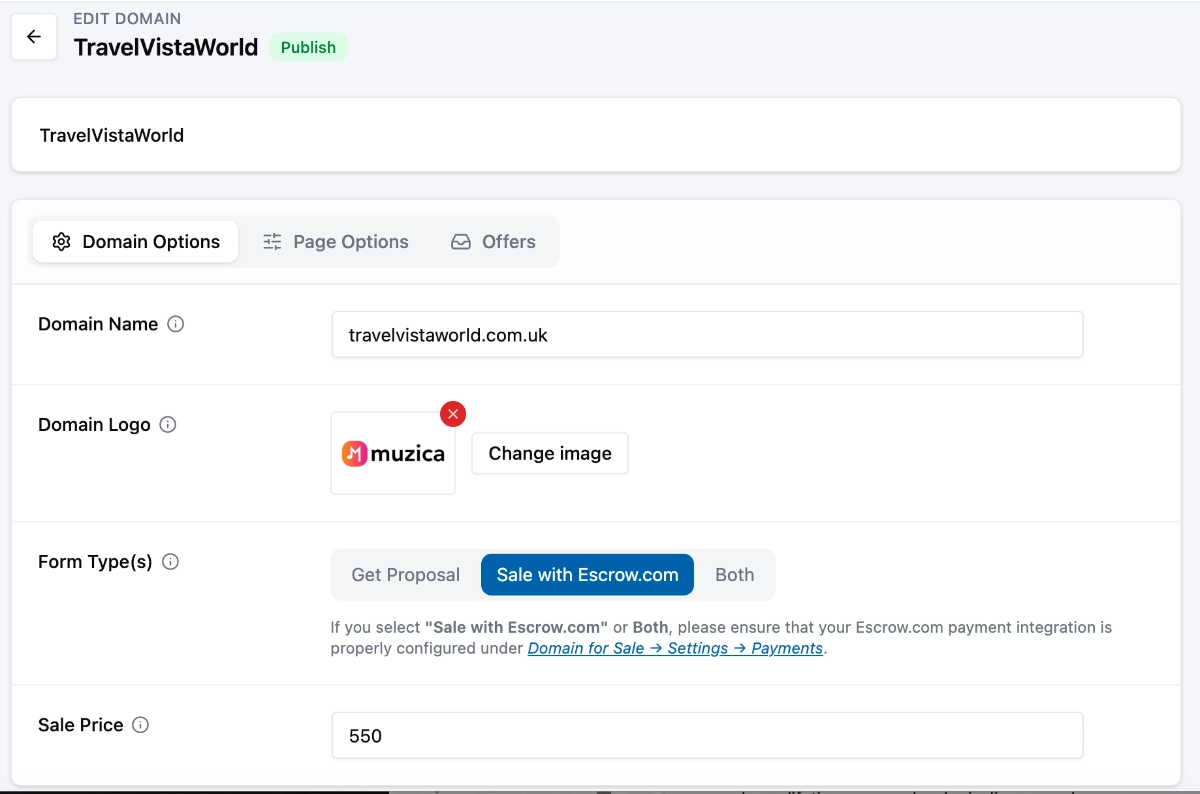
Now attach the purchase option to your domain. Open your domain layout under Domain For Sale → All Domains and set the form configuration — the plugin can show the offer form, the Escrow purchase form, or both, with the Purchase Form Title, Divider Text, and Make Purchase Form as Default Form settings controlling how dual forms appear. A valid sell price must be set for the purchase form to work. [VERIFY: Confirm the current form-type labels and required domain fields in the latest Pro version.]
Step 10: Confirm the Domain Name, Sell Price, and Transaction Details
Before testing, verify the details a transaction will be built from: domain spelling, sale price, currency, your seller email, the fee arrangement, the inspection period, and the buyer-facing labels. A typo in the domain or a misplaced digit in the price can create a transaction for the wrong thing at the wrong amount — a genuine mess to unwind. If you’re still unsure what number to put on the domain, settle that first. [INTERNAL LINK: How to Price a Domain for Resale]
Step 11: Test the Full Buyer Journey
With Sandbox selected, walk through the purchase as a buyer would. Confirm each of these:
- The Escrow form appears on the public page.
- The correct domain and price are shown.
- The form fields validate and submit properly.
- The buyer is handed off to the sandbox Escrow.com environment, not the live one.
- The domain and price carry through to the transaction correctly.
- The transaction appears under Domain For Sale → Transactions in WordPress.
- Notification emails arrive.
- No API key or private data appears in the page source, browser console, or logs.
Step 12: Switch From Sandbox to Live Mode
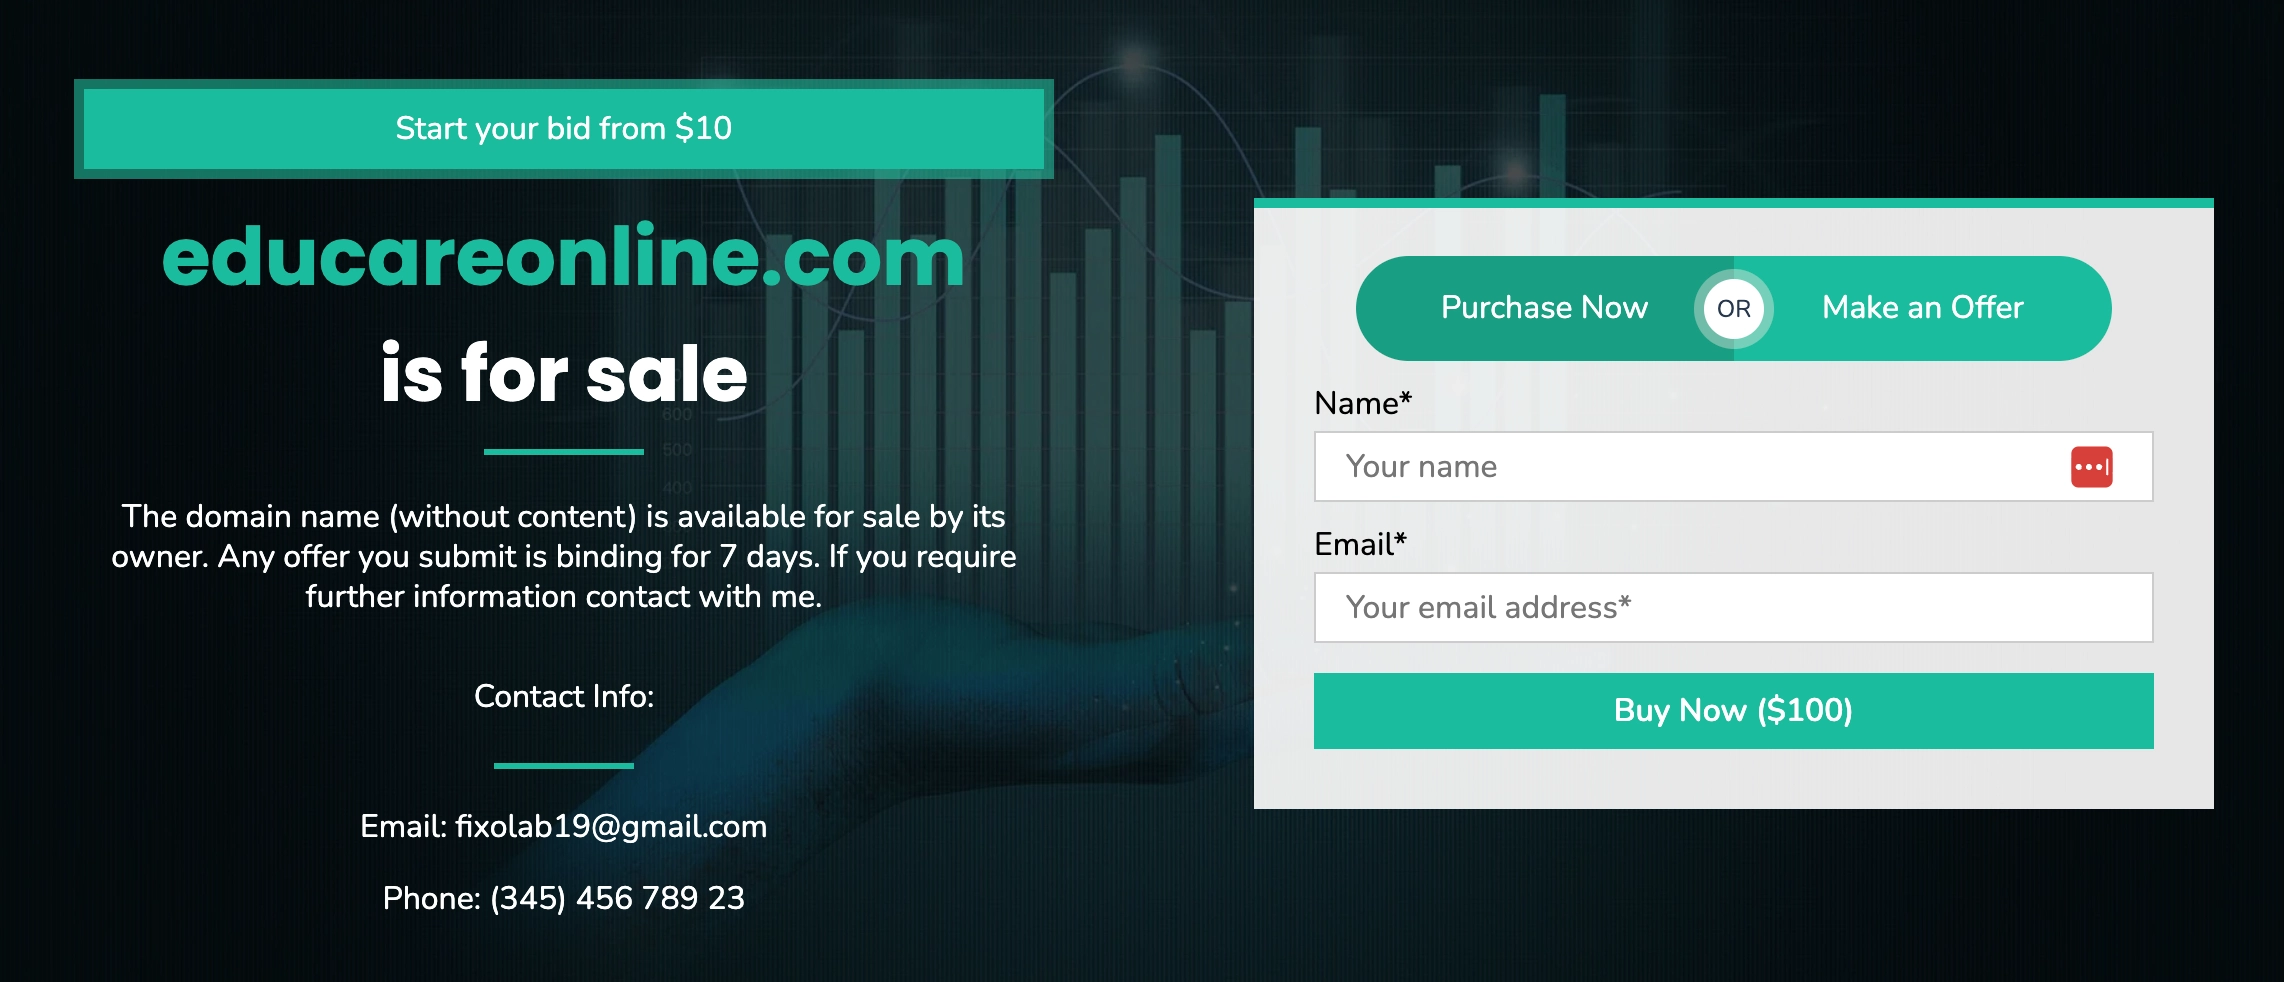
Only after the sandbox test passes, change Escrow API URL to Live and confirm you’re using your live Escrow.com credentials. Run this pre-launch check: correct Escrow account and email, correct API key for the live environment, correct domain, currency, and sale price, HTTPS working, all caches cleared so no sandbox form lingers, notifications tested, and a fresh backup taken.
Step 13: Test the Live Page Without Completing a Purchase
Open the domain in a private browser window while logged out, on desktop and mobile. Confirm the displayed price, and check that purchase links point to the legitimate escrow.com domain. You’re inspecting, not buying — no real transaction needed. If anything looks like the old sandbox version, clear your WordPress, hosting, CDN, and browser caches and check again.
Offering Escrow After a Buyer Makes an Offer
Not every sale starts with a buy-now click — often a buyer submits an offer, you negotiate, and only then is there a price to transact at. The integration covers this: open the offer under Domain For Sale → Offers and use the Invite to Buy via Escrow option to send a personalized purchase invitation at the agreed price. The buyer receives an email with their purchase link and continues through Escrow.com, and the transaction appears in your Transactions screen. [VERIFY: Confirm the exact invitation workflow and transaction status labels in the latest Pro version.]
What Happens After the Buyer Clicks the Escrow Option?
The buyer submits the purchase form on your site, and the transaction itself is created with Escrow.com — the buyer completes agreement, account sign-in or creation, and payment on Escrow.com’s side, not on your WordPress site. [VERIFY: Confirm whether the buyer is redirected immediately or receives the Escrow purchase link by email in the current version.]
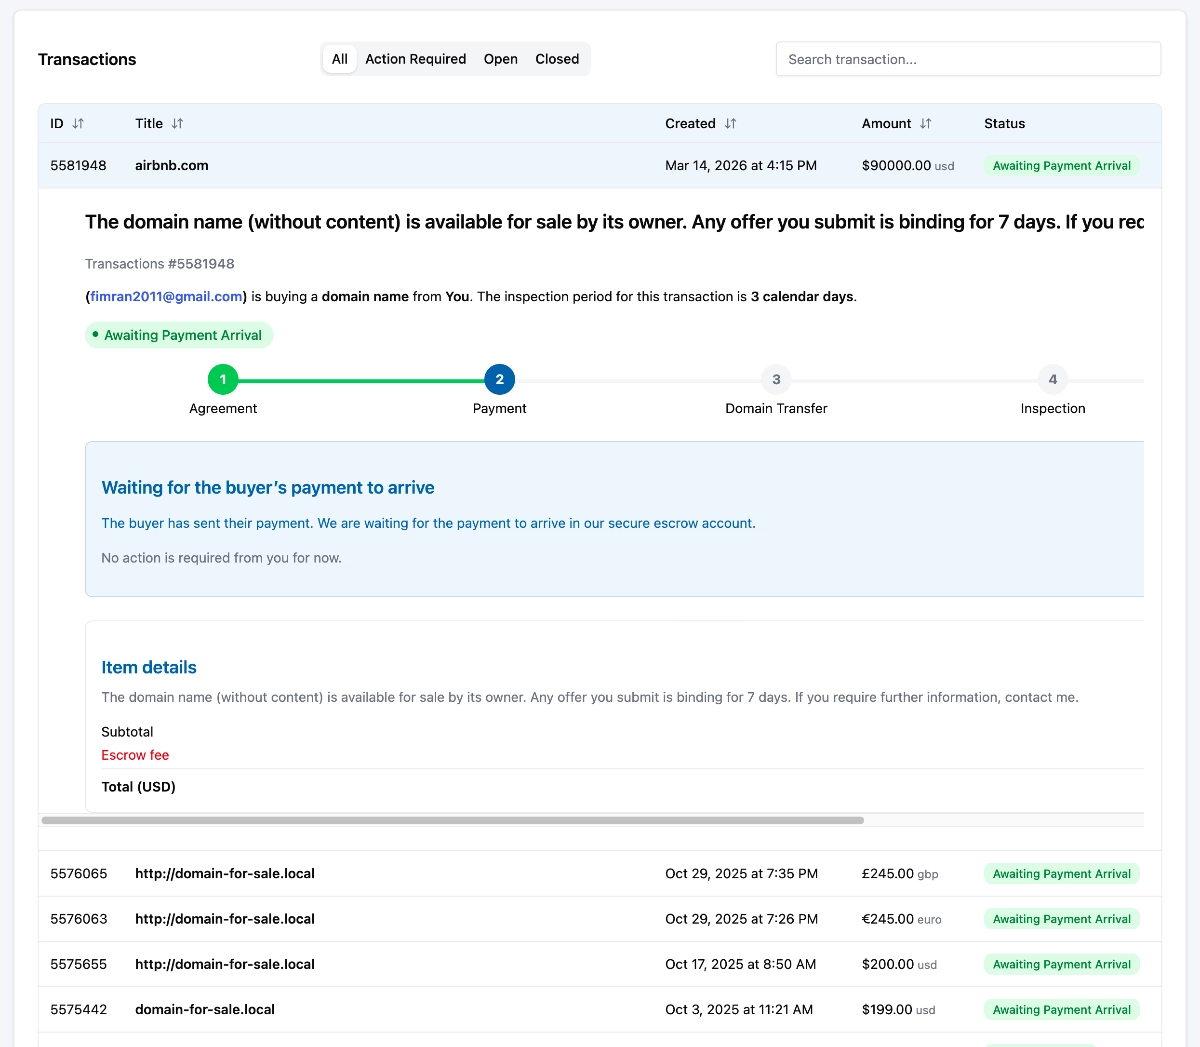
On your side, the transaction appears under Domain For Sale → Transactions with the Escrow.com transaction ID, buyer email, amount, and a status tracker following the five Escrow stages: Agreement, Payment, Domain Transfer, Inspection, and Closed. The same transaction appears in your Escrow.com dashboard, which remains the authoritative record. Your WordPress site never receives, holds, or stores the buyer’s money — it displays transaction information synced from Escrow.com.
When Is It Safe to Transfer the Domain?
This is the rule that protects you more than any other: do not transfer the domain because a buyer says they paid, and do not rely solely on an email notification — even one that looks like it came from Escrow.com. Instead:
- Type escrow.com into your browser yourself, or use a trusted bookmark.
- Sign in to your account directly.
- Open the relevant transaction.
- Confirm Escrow.com shows the buyer’s payment as secured.
- Confirm the transaction instructs you to begin the transfer.
- Check the exact domain and agreed terms one more time.
- Follow your registrar’s secure transfer procedure.
The transfer itself generally happens one of two ways.
Account Push
The domain moves between two accounts at the same registrar. This is usually the faster route, but it still demands care: confirm the buyer’s exact account details through the transaction before pushing, because a push to the wrong account is very difficult to undo.
Registrar Transfer
The domain moves to a different registrar, typically using an authorization (EPP) code. Transfer locks, recently changed registrant details, upcoming expiration dates, and individual registrar policies can all affect eligibility and timing, so check your registrar’s requirements before committing to a transfer deadline. [INTERNAL LINK: How to Transfer a Domain Safely After a Sale]
What Happens After the Domain Is Transferred?
Mark the transfer as completed in the transaction where required. The buyer confirms control of the domain, or Escrow.com verifies the transfer through available registration records, and the inspection period runs. Once the requirements are satisfied, Escrow.com releases the funds according to the terms — timing depends on the transaction, so don’t plan around a same-day payout.
Keep your records: transaction details, registrar confirmation emails, transfer receipts, buyer communication, and whatever your accountant needs. If a question comes up months later, those records settle it.
Who Pays the Escrow.com Fee?
Whoever the buyer and seller agree should pay it. The common arrangements are buyer pays, seller pays, or a split — Domain For Sale Pro’s Escrow Fee Paid By setting supports all three. Arrangements can depend on the transaction type, and fee amounts change, so check the current cost with the official Escrow.com fee calculator. Agree on fee responsibility before the transaction is created — it’s awkward to renegotiate afterward.
Can You Use Escrow.com Without Domain For Sale Pro?
Yes. Either party can sign in to Escrow.com, create a new domain transaction, and invite the other party to review and accept the terms. The transaction then proceeds exactly as described above. This manual method is just as secure — the protection comes from Escrow.com, not from the plugin.
What the Pro integration changes is workflow, not safety: the purchase option sits directly on your sale page, domain and price details pass into the transaction automatically, invitations go out from the Offers dashboard after a negotiation, and transaction status is visible inside WordPress. If you sell domains regularly, that reduces real friction; for a single sale with a buyer already at the table, the manual method may be all you need. Selling directly like this also means you can sell a domain without paying commission.
Security Checklist to Accept Domain Payments Securely
- Use a unique Escrow.com password, and enable multifactor authentication if available.
- Verify the website address before signing in — always escrow.com, typed or bookmarked.
- Don’t trust unexpected payment screenshots or forwarded confirmations.
- Never disclose your API key, and revoke it immediately if exposed.
- Keep HTTPS active and WordPress, themes, and plugins updated.
- Restrict administrator access, and back up the site before changing payment settings.
- Test in sandbox mode before going live.
- Confirm transaction status inside your authenticated Escrow.com account before transferring.
- Verify the buyer’s registrar account information before an account push.
- Transfer only what the written terms include — nothing extra.
No checklist stops every fraud attempt, but this one removes the openings most attempts rely on.
Troubleshooting the Escrow.com WordPress Integration
Why Isn’t the Escrow Purchase Form Appearing?
Check, in order: the Enable Escrow.com Payment toggle is on, the API key and Escrow email are entered, the domain has a sell price configured, and the domain’s form settings aren’t set to offer-only. Then view the page in a private window to rule out caching, and confirm the plugin is up to date. If it still fails, temporarily disable optimization plugins one at a time to find a conflict.
Why Is the Escrow API Connection Failing?
The usual causes: an incorrect or revoked API key, a key generated under a different email than the one in the Escrow Email field, or sandbox credentials paired with the Live environment (and vice versa). Beyond credentials, a server firewall, security plugin, or hosting restriction can block outbound requests, and SSL problems can break the connection. Don’t paste your credentials into a support forum while debugging — describe the error instead.
Why Is the Buyer Seeing the Wrong Price?
Compare the regular price and sale price fields on the domain, confirm the currency setting, and clear caches — stale HTML is the most common culprit. Also check for duplicate domain listings and leftover sandbox test data. If a buyer has already started a transaction at a mismatched price, stop and correct it first; never proceed with a transaction whose numbers don’t match the agreement.
Why Didn’t the Buyer Receive the Invitation?
Confirm the buyer’s email address is correct, ask them to check spam, and review the offer and transaction status in WordPress. If WordPress emails aren’t arriving in general, the site likely needs an SMTP plugin — a hosting-level mail limitation, not an integration fault. Once delivery works, send a fresh invitation rather than assuming the old one arrived.
Why Is a Sandbox Transaction Appearing on the Live Page?
Check the Escrow API URL setting first — it may still be on Sandbox. If the setting is correct, the sandbox form is probably cached: clear the WordPress cache, hosting cache, CDN, and your browser. Staging sites are another source, since a database copied to production carries its sandbox settings with it. Don’t accept live payments until the environment is confirmed correct.
What Should I Do If My API Key Was Exposed?
Act immediately: revoke the exposed key in Escrow.com, generate a new one, and update the plugin setting. Then remove the key from wherever it leaked — screenshots, logs, repositories, support tickets, messages. Review your recent Escrow.com account and transaction activity, and contact Escrow.com support if anything looks suspicious. A revoked key is harmless; an exposed active one is not.
Frequently Asked Questions
Is Escrow.com safe for domain sales?
Escrow.com is a widely used, licensed escrow provider, operated by Internet Escrow Services, Inc., which holds escrow and money transmitter licenses across U.S. jurisdictions. The escrow model is what reduces risk: the buyer’s payment is secured with a neutral third party before the seller transfers the domain, and funds are released only after the transaction requirements are met. That doesn’t make every transaction problem-free, but it removes the main failure mode of direct payment — transferring a domain against money that was never really there.
How do I accept domain payments securely?
Follow a sequence that never depends on trusting the other party’s word: agree on written terms (domain, price, fees, inspection period), create the transaction through a reputable escrow service, wait until the escrow provider confirms the funds are secured, transfer the domain through your registrar’s secure procedure, let the buyer confirm receipt, and receive the released funds. The critical habit is confirming payment status inside your authenticated escrow account — never from an email, screenshot, or message a buyer sends you.
Can I use Escrow.com with WordPress?
Yes, two ways. Manually: you and the buyer create and complete the transaction on Escrow.com itself, with no WordPress involvement. Or integrated: Domain For Sale Pro connects your WordPress domain sale page to Escrow.com through your account email and API key, so buyers can start a purchase from the landing page and transaction status appears in WordPress. Both routes run the same Escrow.com transaction underneath — the integration is a workflow convenience, not a different security model.
Who pays the Escrow.com fee — the buyer or seller?
It’s negotiable. The buyer can pay, the seller can pay, or the two can split it, depending on what’s agreed and what the transaction type supports — Domain For Sale Pro’s settings support all three arrangements. Fee amounts vary by transaction size and payment details, so use the official Escrow.com fee calculator for a current figure, and settle who pays before the transaction is created.
Does Domain For Sale Pro hold the buyer’s money?
No. The plugin never receives, holds, or stores any funds. All payments go to and from Escrow.com, the licensed escrow provider, and are governed by the Escrow.com transaction terms. Domain For Sale Pro provides the WordPress interface: the purchase form on your sale page, the buyer invitations, and a synced view of transaction status. Your Escrow.com account remains the authoritative record of the money at every stage.
Should I transfer a domain after receiving an Escrow.com email?
Not on the email alone. Emails can be spoofed convincingly, and a lookalike “funds secured” message is a known fraud pattern. Open your browser, type escrow.com yourself, sign in, and check the transaction status directly. If your authenticated account shows the payment is secured and instructs you to begin the transfer, proceed. If the account doesn’t match the email, report it and don’t transfer anything.
Conclusion
The whole guide reduces to one principle: don’t transfer a domain until the escrow provider confirms, inside your authenticated account, that the buyer’s payment is secured and the transfer should begin. Everything else — the sandbox testing, the checklists, the caution about emails — exists to protect that moment. That’s what it takes to accept domain payments securely, whether you’re doing it manually or through a WordPress integration.
An Escrow.com integration for WordPress gives domain sellers a more structured way to move buyers from a sale page into a protected transaction. You can use Escrow.com manually today, with no plugin at all. If you’re selling through a WordPress landing page and want the purchase flow, offer invitations, and transaction tracking in one place, the Domain For Sale Pro Escrow integration is worth a look — as a convenience that reduces setup friction, not as a requirement for selling safely.